 The doorbell has been around for ages and has supplanted the humble door knocker as the best way to notify a resident of visitors at their abode. Improvements have been made to the doorbell over the years, and we’re in the midst of the next batch of doorbell improvements now. Video doorbells are becoming more prevalent these days, and Ring has been there from the beginning. Does the Ring Video Doorbell 2 continue with the quality that we’ve seen previously from the brand? Keep reading to find out.
Specifications
The Ring Video Doorbell 2 has the following features and specifications:
- 1080p HD video
- Rechargeable battery pack
- Wide-angle camera lens
- Motion-activated alerts
- Wi-Fi compatible
- Weather-resistant
- Adjustable motion sensors
- Easy installation
- Lifetime purchase protection
- Power: Battery, Hardwired (8-24 VAC)
- Connectivity: 802.11 b/g/n Wi-Fi connection @ 2.4GHz
- Wi-Fi Speeds: Requires a minimum upload speed of 1Mbps, but 2Mbps is recommended for optimal performance.
- Audio: Two-way audio with noise cancellation
- Video: 1080p HD Video, Live View, Night Vision
- Motion Detection: Adjustable Motion Zones
- Dimensions: 5.05 in. x 2.50 in. x 1.08 in. (12.83cm x 6.35cm x 2.74cm)
- Field of View: 160 Degrees
- Warranty: 1 year on parts, lifetime purchase protection
- Operating Conditions: -5°F to 120°F (-20°C to 48°C)
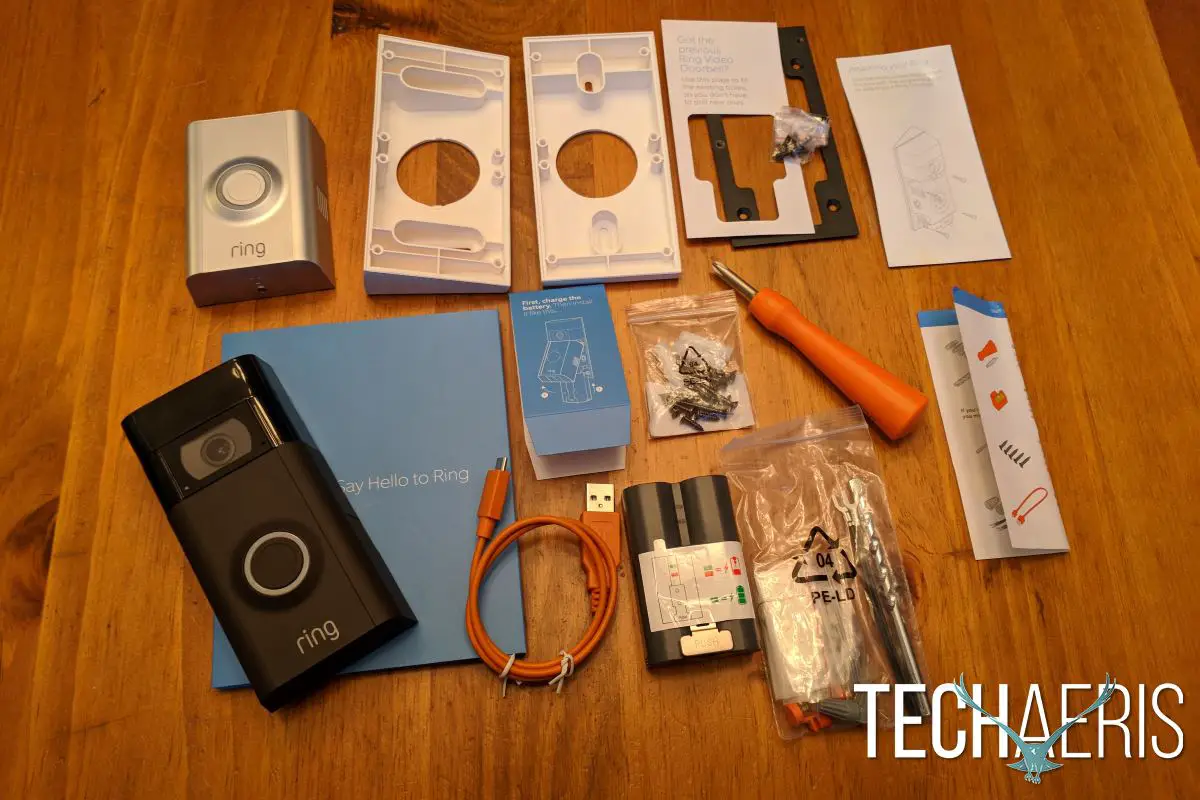
What’s in the Box
- Ring Video Doorbell 2
- Quick Release Battery Pack
- Satin Nickel and Venetian Faceplates
- Adapter Plate
- Wedge and Corner Install Kits
- User Manual
- Security Sticker
- Installation Tools and Screws
Design
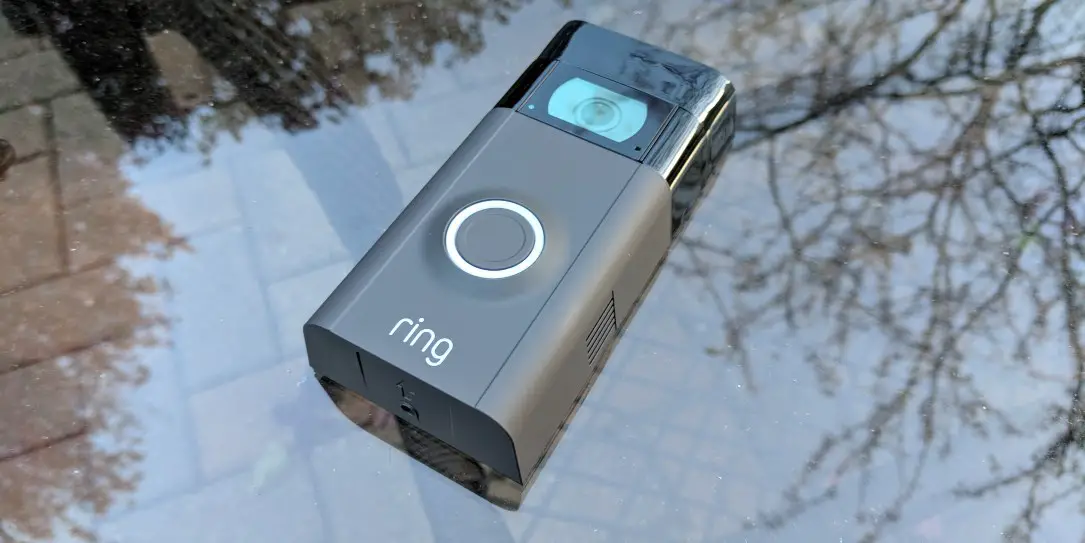
The Ring Video Doorbell 2 has quite a lot in common with its predecessor. It is very slightly wider and very slightly deeper than the initial model of video doorbell, but there are quite a few more similarities. The doorbell itself is approximately 5” x 2.5” x 1” with a slightly rounded trapezoidal shape if looking at it from the top or bottom.
Looking from the front, the top third is a shiny black plastic, with the camera lens in the middle. The lens is flanked by a sensor and the microphone on the bottom corners of the camera enclosure. The remaining bottom portion is a soft touch plastic with the LED ring and doorbell button in the middle. The circular LED ring and doorbell button are raised very slightly from the body of the rest of the doorbell. The Ring name mark is centered at the bottom of the front of the device. On either side of the doorbell lined up with the doorbell button are speaker grilles so you can talk to whoever is at your door.
The bottom portion detaches from the rest of the housing to install or remove the battery. While the doorbell can be hard-wired directly to your doorbell wiring, the battery is still necessary to power the doorbell. The hard-line wiring will work much like a trickle charger, keeping the battery topped off as best it can. If you’re using your doorbell really frequently, or if your weather stretches lower or higher than the doorbell likes, your battery may drain faster than the wiring can keep it topped off.
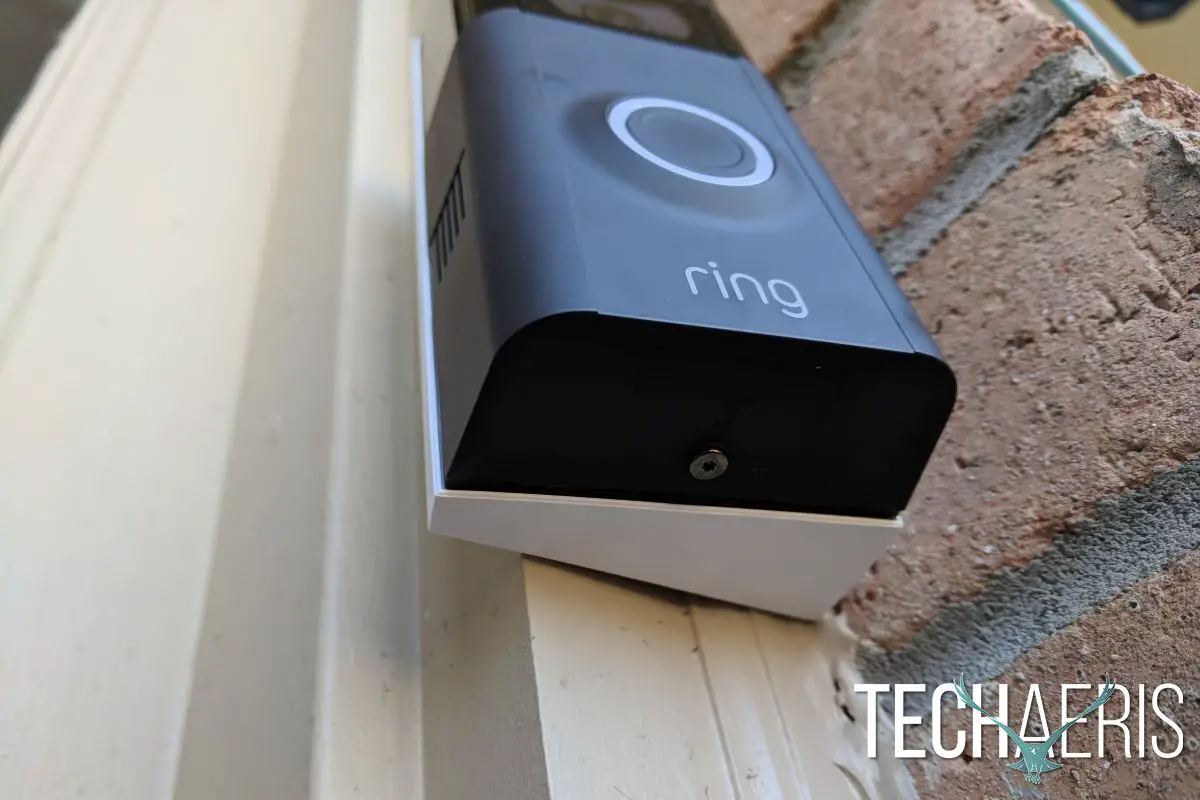
On the bottom of the doorbell, you’ll find a hole for the included security screw which prevents anyone from taking off the cover, removing the battery, and generally disabling your doorbell. The back of the doorbell includes two screws which are used to hardwire the doorbell to your existing wiring.
Installation
Getting your Ring Video Doorbell 2 set up and installed is pretty straightforward. Ring has the system down pretty well, and they provide quality instructions to get you on your way. You have the option to either use the doorbell’s battery to power the device or to hardwire the doorbell to your existing doorbell wiring. Either way, you’re going to need to fully charge the doorbell’s battery prior to installation, because while hardwiring does power the doorbell, it works more as a trickle charger meaning the battery can still be depleted with enough use. Normal use should keep the battery topped off without issue, but general use, as well as cold weather, can cause the battery to deplete even when it’s hard-wired.
Once the battery is charged and installed in the doorbell, you’ll want to install the Ring app on your Android or iOS device. The app walks you through part of the setup process, where you’ll first connect to the WiFi that is output by the doorbell itself, and then connect the doorbell to your own WiFi for use. You can test using the doorbell before installing it on your house just to see how it works.
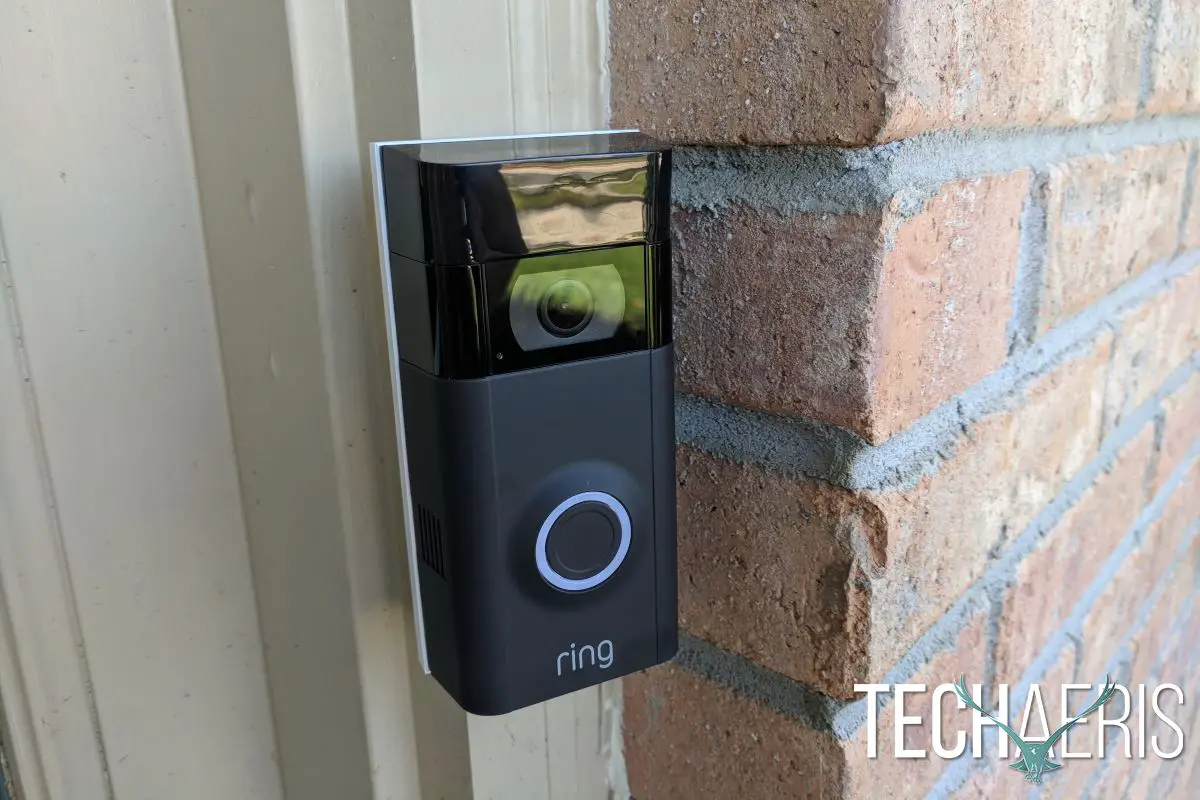
Once you’ve got your doorbell connected to your WiFi, you can contemplate attaching the doorbell to your house. If you’re upgrading from the original Ring doorbell, Ring has included a mount that allows you to use your existing doorbell holes with the Ring 2 rather than drilling new holes. If you’re new to the Ring ecosystem, you’ll be adding some new holes. Ring has included everything you’ll need to install whether on wood or concrete. Concrete will require a few more steps, including drilling pilot holes and adding the screw mounts. Installing into wood is a bit easier. Either way, Ring provides video tutorials to walk you through the steps.
One of the most important steps to take if you’re planning on hardwiring your doorbell to your existing hardware is finding the transformer attached to your doorbell wiring. Ring requires a transformer with a voltage of 8–24VAC to work properly, and depending on the age of your house, or how the electrical wiring is set up, finding and changing the transformer could be a bit of a problem. For example, in my case, thankfully the transformer was appropriate so I didn’t need to change it, but the transformer was located in the ceiling in my basement, directly above a smoke detector. Thankfully I simply needed to confirm that the transformer was to spec for Ring to function, but if you need to change out your transformer there are plenty of tutorials available online.
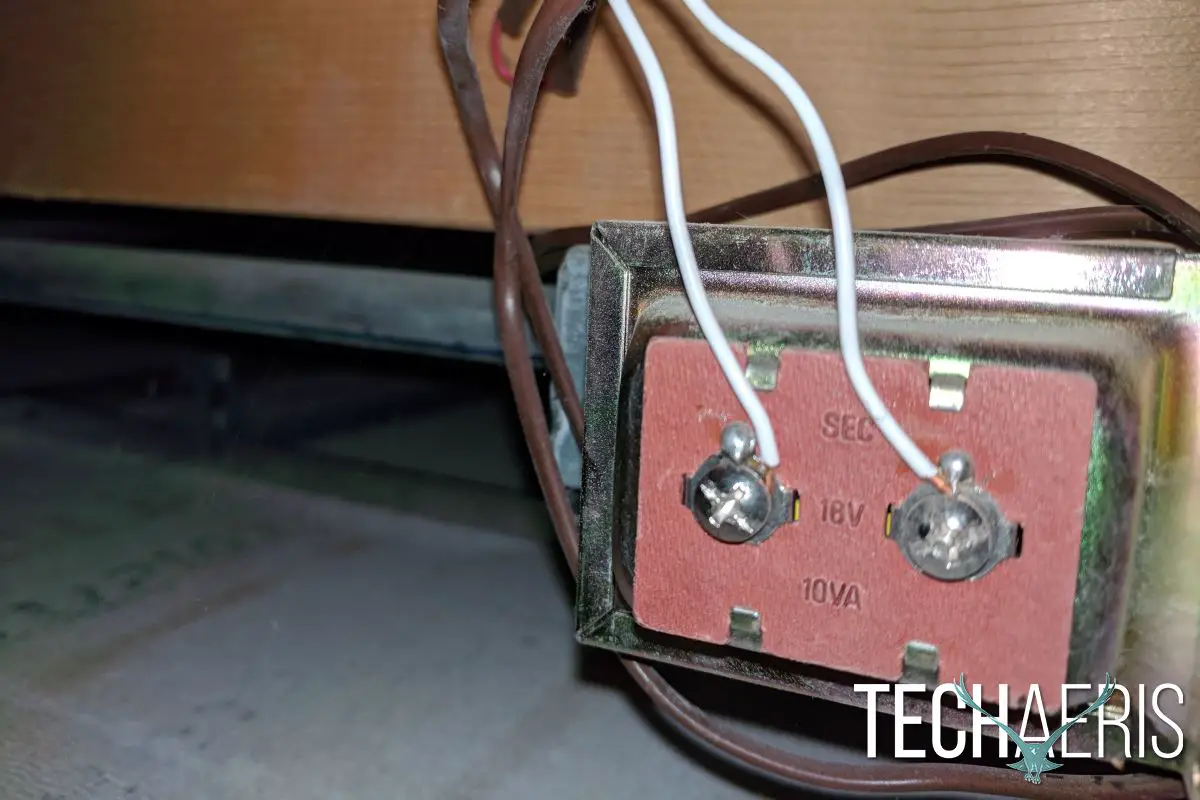
Ring recommends disconnecting power from the existing doorbell prior to installation, and really that’s the best way to go. Better to be safe than sorry and whatnot. The doorbell wiring needs to be attached to the screws on the back of the doorbell. Loosen the screws and attach the curved wiring to either post. Either wire can go on either post, just install one on each.
If your door frame is wide enough to simply accommodate the video doorbell, you can simply screw the four corners of the doorbell to your doorframe. If you’ve got a narrow area to install, or if you’re installing in an area where you need to tilt or rotate your Ring Video Doorbell 2, Ring has included two mounts for just such a purpose. The tilt mount is best for doors that are either at the top or bottom of a set of stairs and provide a better overall view of the doorway without picking up too much additional unnecessary movement. The rotation mount will adjust the angle slightly to pick up the best possible view of your doorway. Each of those mounts requires two centered screws to install, and both can be used if necessary. Once the mount(s) are installed, the Ring doorbell can then be screwed into the mount.
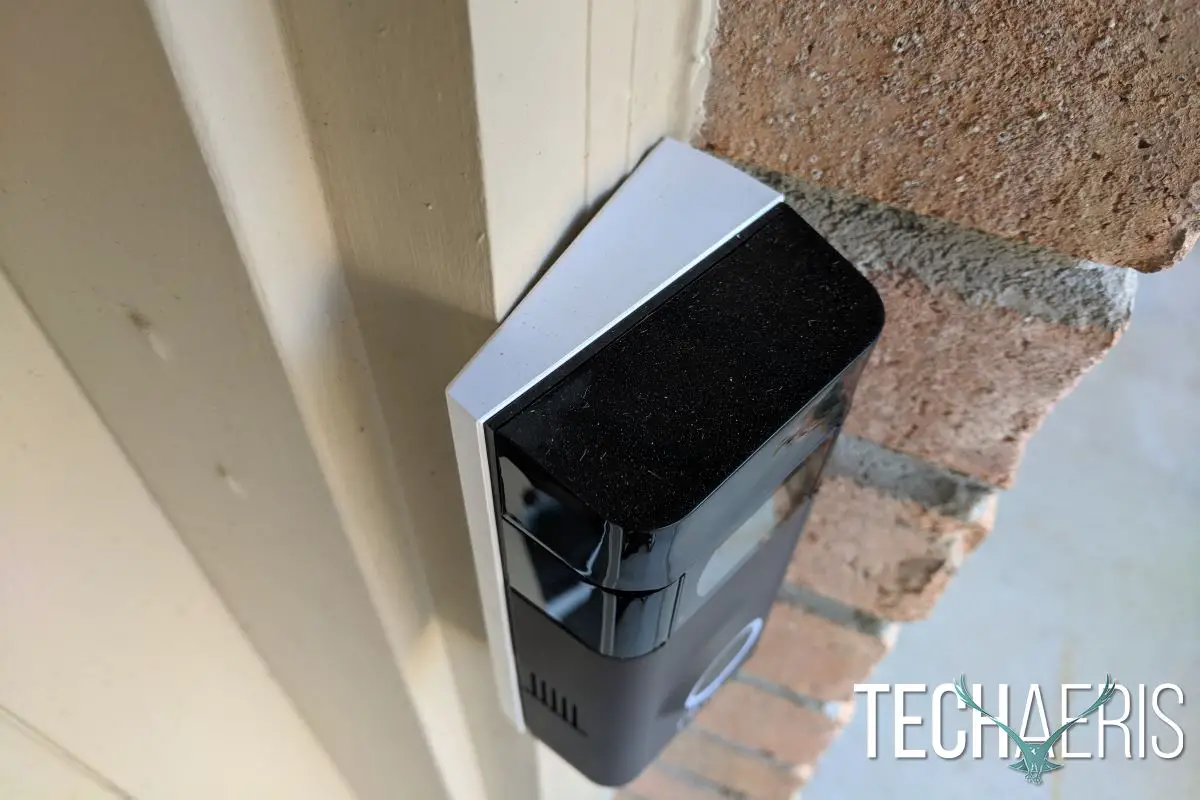
After the doorbell has been mounted, the top cover clicks into place over the bottom portion of the doorbell, and a security screw is screwed into the bottom of the doorbell to keep anyone from tampering with the doorbell or battery.
App/Software
The Ring app is available on Android and iOS (web access for some settings is available via Windows 10 as well) and as mentioned in the Installation section above, handles the initial setup of your new video doorbell. After your device is set up and installed, the app will handle your day-to-day operation of the doorbell. That includes general doorbell ringing as well as motion alerts. The app also allows you to sign up for your neighborhood group, seeing shared video from other users in your area for suspicious or unusual activity.
The traditional doorbell operation comes through as a notification on your smartphone. Once accepted, you’ll be taken to a live view of what’s going on outside of your door, and can either talk directly to those at your door or close the video feed if you’d prefer. Motion alerts are handled the same way. After you set up the areas you’d like monitored you’ll be notified whenever there’s motion inside of those areas. Pulling up the notification will once again provide a live look at what’s going on.
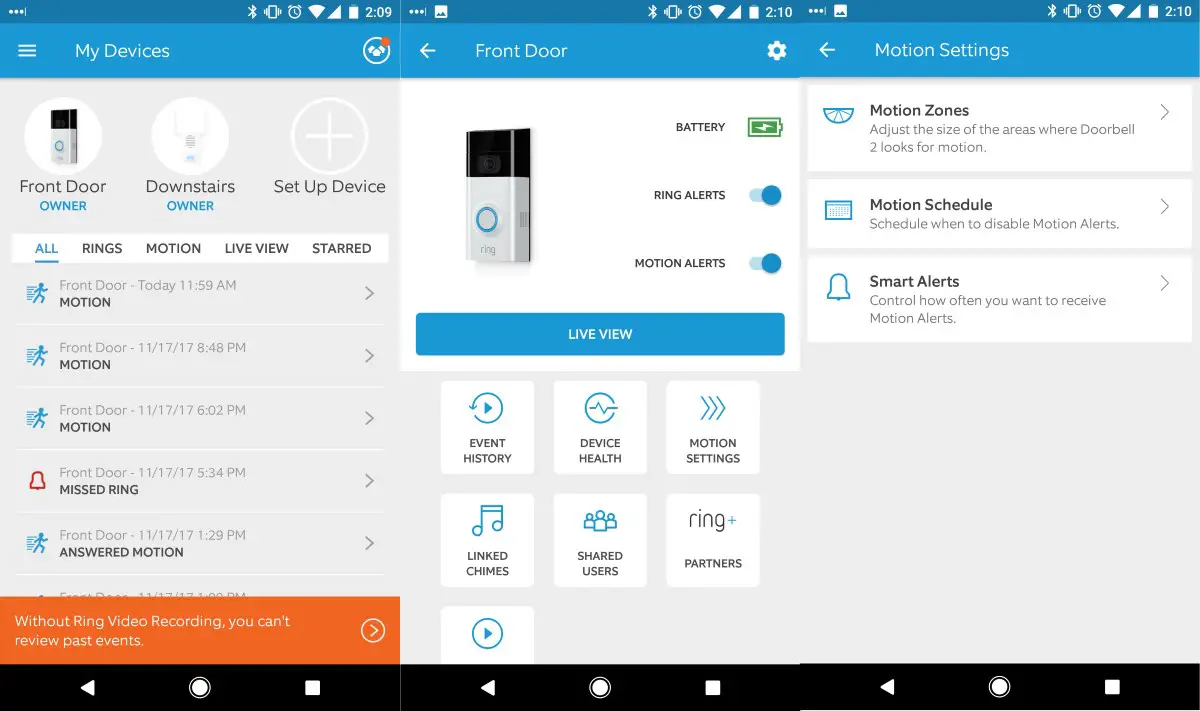
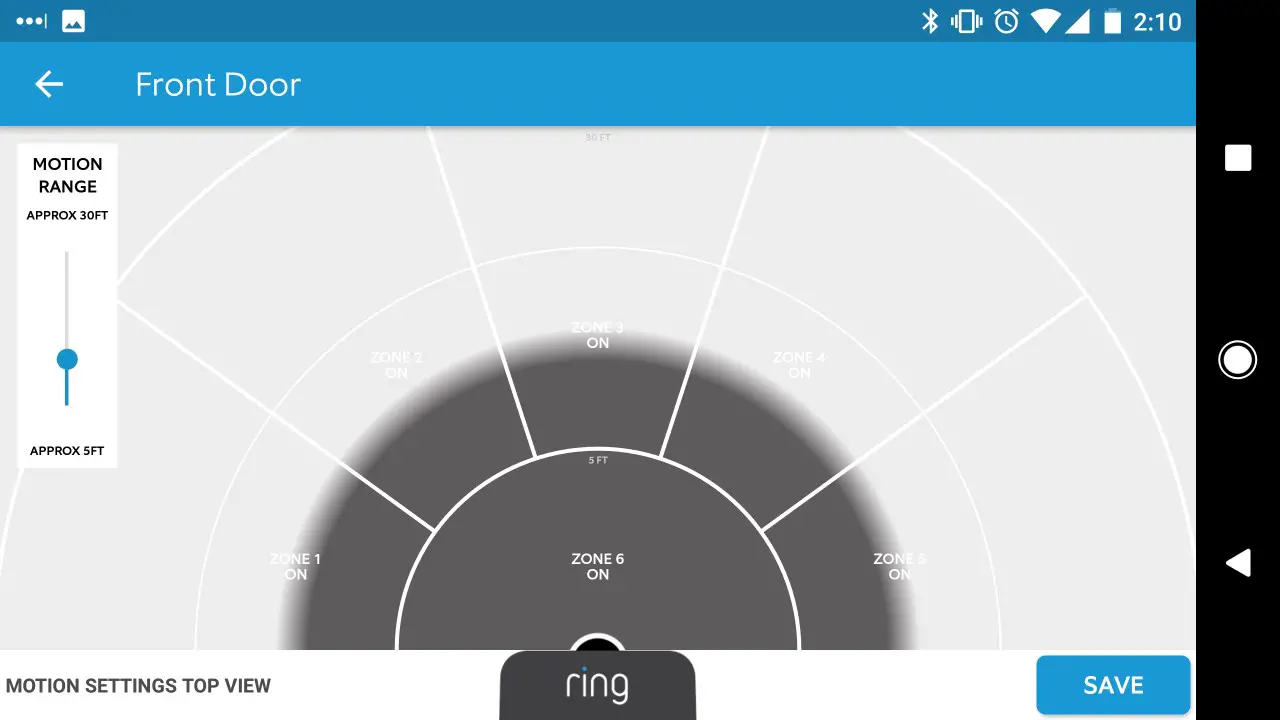
Motion alerts can be kind of hit or miss. Even though I’ve set my alert range to about 8-10 feet from my front door, I’ll still occasionally get motion alerts from the street in front of my house. I did, however, manage to get a fantastic shot of a phone book delivery where it was clear the delivery man had practiced, as the book was flipped expertly from about 10 feet away without the delivery man breaking his stride. So the quality of video and motion detection is definitely there, you’ll just occasionally run into some more pointless alerts as well.
Opening the app without any notifications coming in will bring you to the “My Devices” screen by default. This will give you an opportunity to review any Rings, Motion, Live View, or Starred events that have been saved in the app. The My Neighborhood icon is in the upper right corner of this screen as well.
Selecting your doorbell from the “My Devices” screen will bring you to a screen that shows you the battery life, allows you to turn ring alerts and motion alerts on or off, and a Live View button. Below this are some more options including Event History, Device Health, Motion Settings, Linked Chimes, Shared Users, Partners, and Live View Settings.
Many of those options are pretty self-explanatory, though I’ll talk a bit about Device Health, Shared Users, and Partners. Device Health just provides a high-level overview of your device. It reports how the doorbell is powered (hardwired or battery), tells you the status of the battery, and the status and strength of your Wi-Fi network.Shared Users allows you to add family members to your Ring account, allowing them to view motion or doorbell events, though they are not able to change any settings. Partners allow you to pair your Ring with other smart home devices including smart locks and lighting. Current partners include Wemo, Lockstate, Smartlink, ADT Pulse, Kevo, Wink, Kisi, and Lockitron.
Ease of Use
The hardest part here is the installation, and that’s still really not all that complicated. After you’ve installed the Ring 2 and set up your motion zones you really just have to wait for something to set off your motion alarm or for someone to come to your door. Depending on how sensitive you’ve set your motion settings, you’ll receive notifications on your phone anytime there’s motion or someone ringing your doorbell.
Performance
Ring sent this doorbell over for review at the absolute perfect time. I got it installed in time for Halloween, so there were plenty of testers willing to come and ring my doorbell! Admittedly, they were probably more interested in the candy, though quite a few commented on the Ring 2 as well. A few weren’t sure exactly what it was, others knew exactly what they were seeing. One pair seemed confused, especially when they pressed the button and the doorbell chime played back letting them know that it had been successfully pressed. I watched that interaction live from my desk approximately 20 miles away from home. Many of the remaining doorbell rings on Halloween were viewed from my couch, or while getting up to answer the door. One of my favorite comments came from a trick-or-treater who just very simply said: “I need one of those because I’m tired of getting up to look out the window.” At least he was honest.
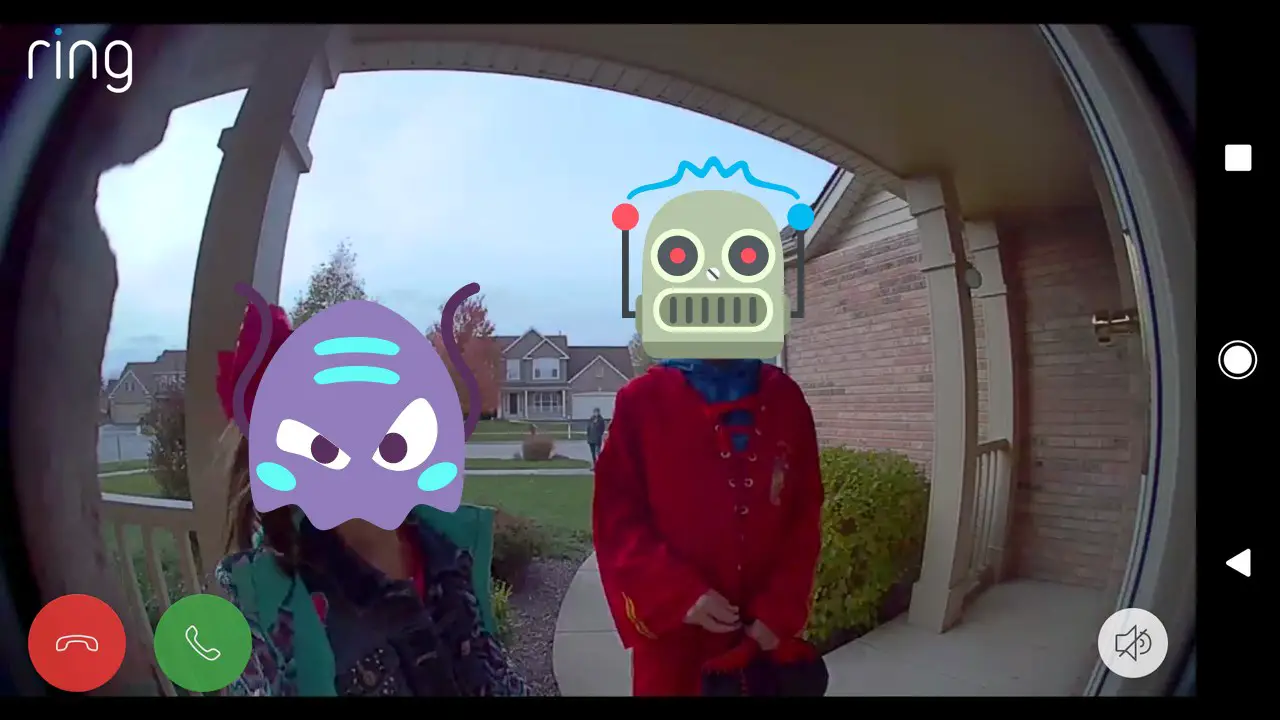
From the other side of the doorbell, performance is still pretty spot-on. Whether you’re at home or away, Ring will notify you of motion or of someone ringing your doorbell. From there you can open the app to get a live look at what Ring sees. Press the green “call” button to talk live to whoever is at your door, or press the red “hang up” button to close the live view. I did have several instances where Ring didn’t notify me until shortly after the motion or doorbell ring had occurred, and maybe one or two times when it didn’t seem to notify me at all, but most everything came through without issue.
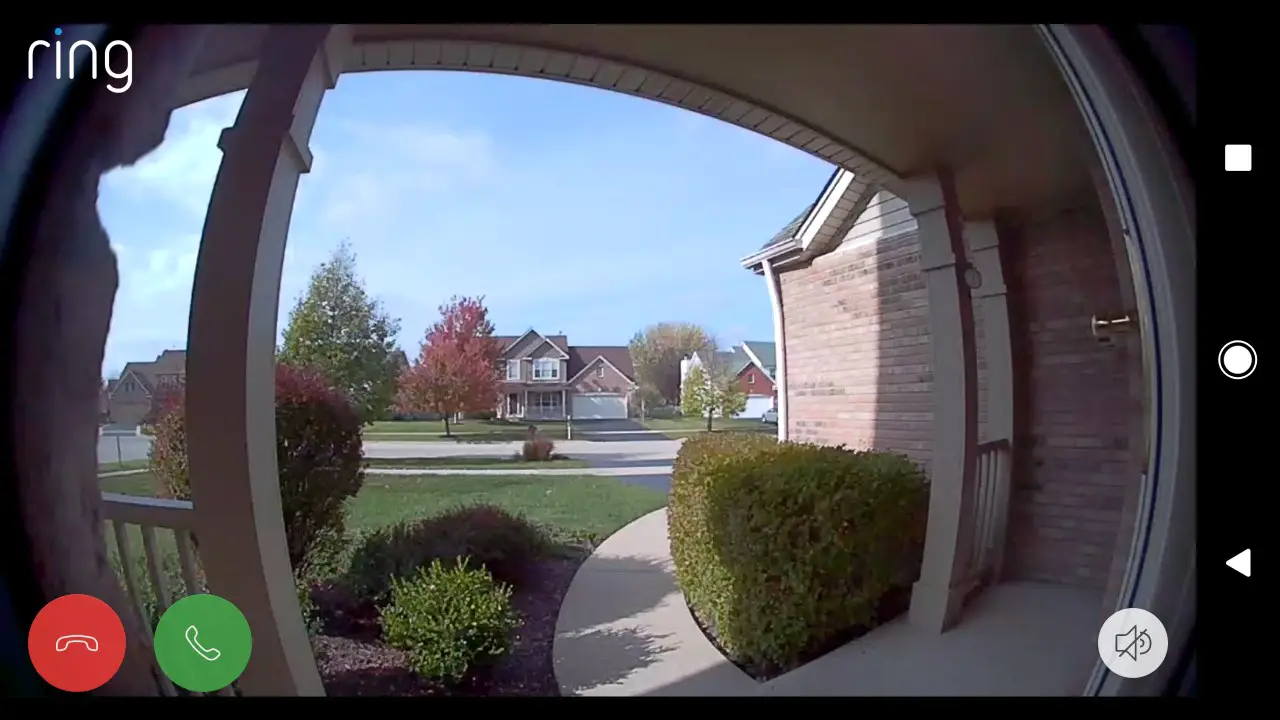
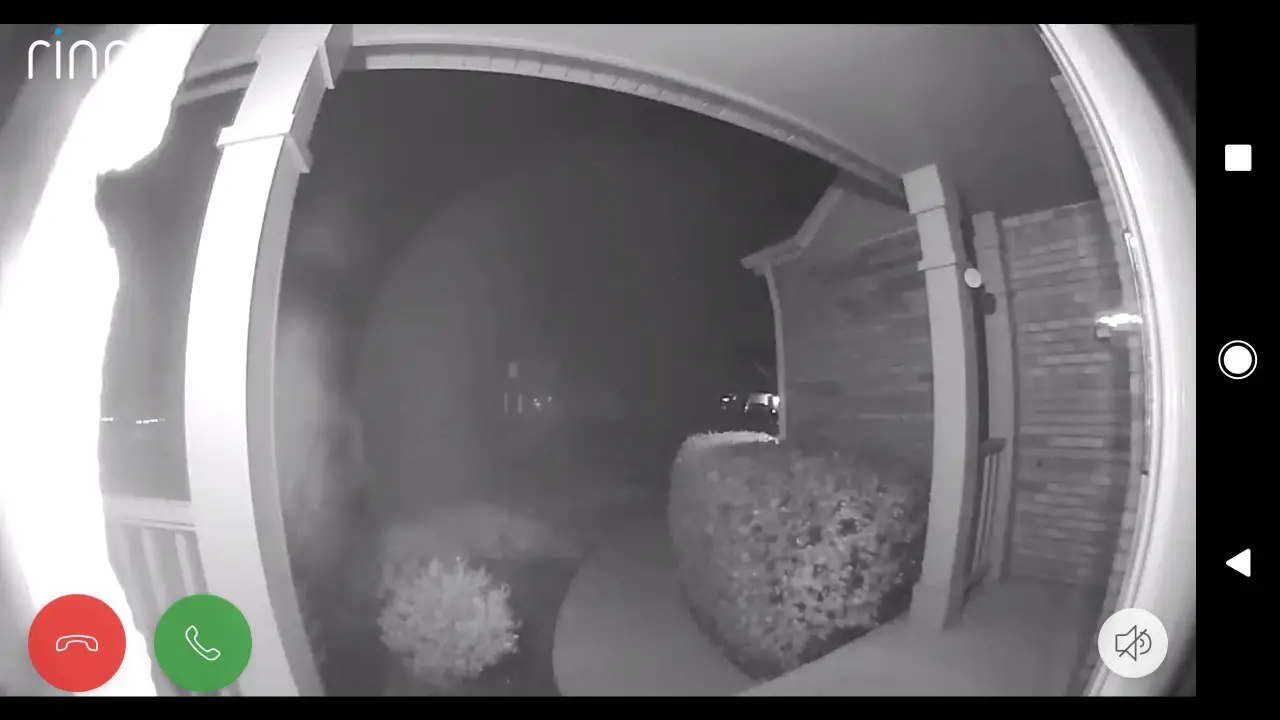
Video from the doorbell comes through bright and clear in 1080p in most circumstances. Your positioning, as well as wireless coverage, can affect the overall video quality though. For example, if your doorbell is facing direct sunlight that can cause issues, or if your wireless router/access point/etc. is too far away from your doorbell that can cause degraded video quality. Ring does offer devices to help with the latter (like the Ring Chime Pro, for example). Infrared night vision ensures that you’ll be able to see who is at your door no matter the time of day.
If you choose to subscribe to a Ring Protect plan (listed as Ring Video Recording in the app), you’ll be able to review previous recordings of motion or doorbell rings. Without this add-on, your recordings will not be saved. Ring Protect will cost you $3 USD per month (or $30 USD per year) for the basic plan, or $10 USD per month ($100 USD per year) for the advanced plan. If you’re simply using a Ring doorbell, the basic plan will probably be enough for you if you’re interested in seeing prior recordings. You will still receive alerts, and be able to view your doorbell feed live without a recording plan in place, though if you want to save or view previous recordings, you’ll need to sign up for a Ring Protect plan. Ring gives new users a 30 day trial of video recording to see what they’d be getting (though curiously my trial ended after about 14 days). If you like what you’re getting from the video recording, the basic plan is pretty reasonably priced.
Price/Value
The Ring Video Doorbell 2 can be purchased for $199 USD, which is a pretty good price for what you’re getting (the very slightest of discounts is available on Amazon, where the doorbell is $198.99 USD). The doorbell gives you clear 1080p video with the ability to view and talk live to whoever is at your door. The live alerts let you know what’s going 24/7, and reasonable video recording options let you replay and share recordings. An easily swappable battery is helpful in case you’re not able to hardwire the doorbell, and a 1-year warranty on parts with a lifetime purchase protection warranty offers some additional peace of mind.
Wrap Up
Having an extra set of “eyes” on your front door at all times is a nice feeling to have. The ability to pull up a live view anytime Ring senses motion or anytime someone rings your doorbell is great. Having that ability whether you’re at home or far away from home is even better. The Ring Video Doorbell 2 gives you all of those capabilities and more. It’s quite functional on its own, though available video recording plans do offer additional options. If you’re looking for a new video doorbell, the Ring Video Doorbell 2 should be on your list.
*We were sent a review sample of the Ring Video Doorbell 2 for the purposes of this review.
Last Updated on November 25, 2017.
Ring Video Doorbell 2
$199 USDNailed it
- Installation isn't too complicated, and plenty of instructional videos are available.
- Everything you'll need for installation is included
- Video is crisp and clear
- Motion detection
- 2 way audio
- Night vision
Needs work
- Occasional missed rings
- Motion detection occasionally reports unnecessary motion
- 30 day trial on video recording cut out significantly earlier than 30 days





Comments are closed.